How to reconcile Square income
This help guide article covers how to reconcile Square income. Square is similar to SumUp and Zettle in that as well as enabling organisations to accept income payment by card, it can also be used as a till system, with both cash and card transactions being recorded.
In this article:
The two options for reconciling Square income
Option 1: Splitting payouts manually using the 'mixed income' option
Option 2: Adding Square as a payment processor account, and uploading and reconciling transactions
- Reconciling Square payouts appearing on your main bank account statement
- Downloading Square transactions (from Square)
- Importing Square transactions to ExpensePlus
- Reconciling Square transactions
- Recording Square CASH that is banked (not relevant for most organisations)
- Why is my Square statement not uploading?
The two options for reconciling Square income
Within ExpensePlus there are 2 choices for how to reconcile Square income (you will need to pick the one that will work best for you).
You should not reconcile payouts from Square as 'Other income' / 'Income Received'. Square charges transaction fees, so recording the net amount that arrives in your bank account simply as income is incorrect from an accounting perspective. Instead, choose one of the above options - both of which enable you to ensure the gross amount of income collected via Square is recorded as income, and the Square transaction fees are correctly recorded as expenditure.
Option 1: Splitting payouts manually using the 'mixed income' option
This can be a good option where you have only a small number of Square transactions, or where all transactions are typically either just card donations, or relate to just one event (and you wish to bulk together similar income transactions and fees).
Option 1 can't be used if you are using Square as a till system through which you are also recording cash income.
Option 2: Adding Square as a payment processor account and uploading and reconciling transactions
This option enables you to upload and reconcile the transactions that form part of your Square payouts in a highly automated and efficient way using the quick-match feature in ExpensePlus, avoiding the need to manually split payouts into gross income and fees.
Option 1: Splitting payouts manually using the 'mixed income' option
Reconciling Square payouts appearing on your main bank account statement
When you reconcile your uploaded bank transactions, select the Square payout on the left-hand table of your match transactions screen, then, in the pop-up that appears, select the transaction type as 'mixed income'.

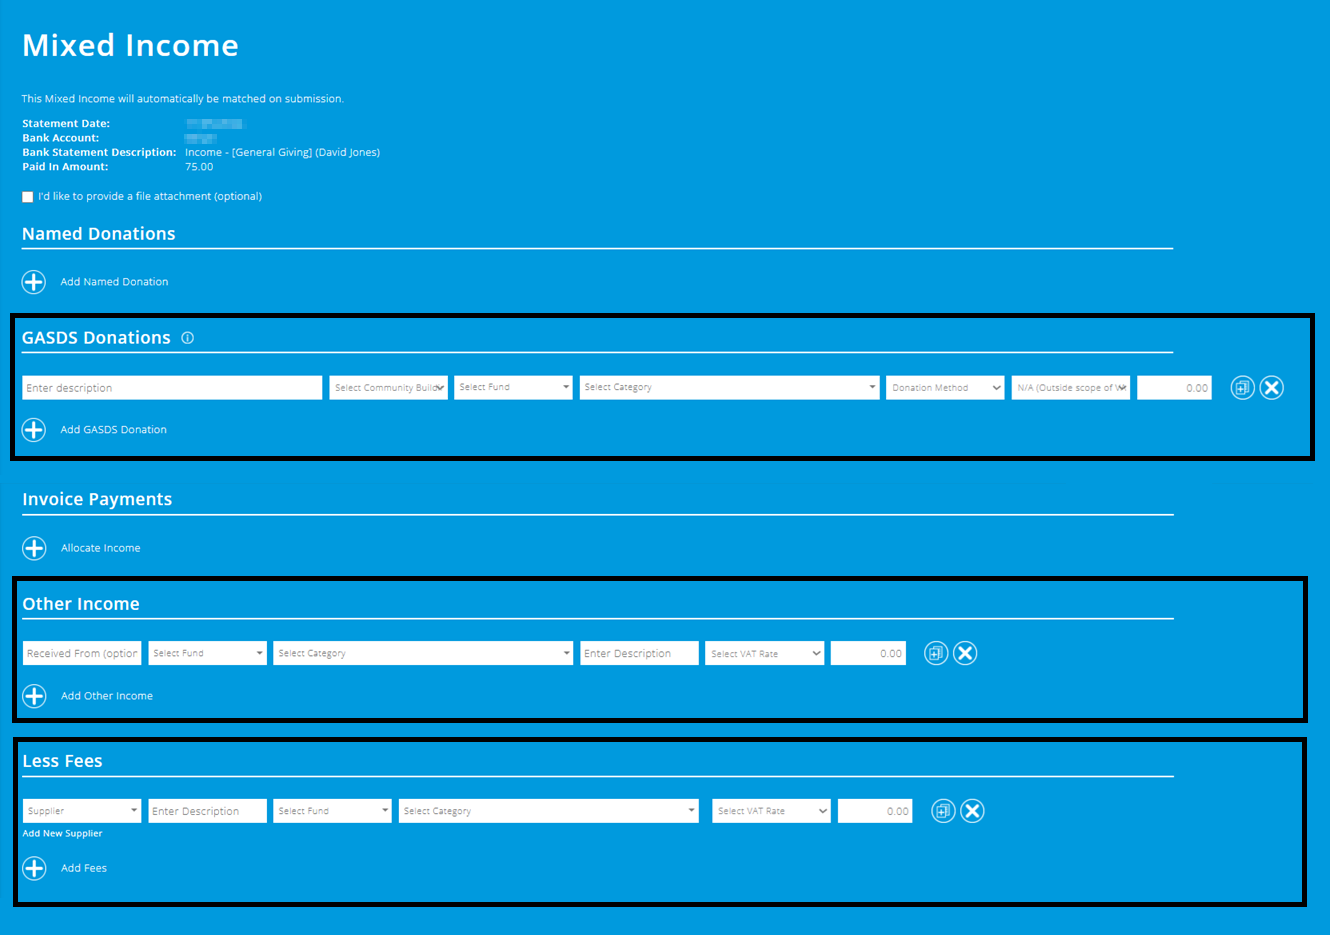
Within the 'Enter Mixed Income' screen, enter the details for the transactions in the Square payout:
- GASDS Donations - any contactless card donations where the amount given is £30 or less
- Other income - all other income, such as ticket / book / cafe sales (along with contactless card donations greater than £30 which are not eligible for GASDS)
- Less Fees - the total of the fees deducted (typically grouped into a single expenditure line).
Typically, the named donation option isn't used, since most donations will be contactless card donations, which can be claimed under GASDS (removing the need to try and manually track at the point of donation which donor gave which amount, with which card number).
Any card donations over £30 are not eligible for GASDS and should be entered instead as 'Other Income' / 'Income Received'.
If you are finding the process of splitting payouts as described above tedious or time-consuming, then we'd recommend you consider option 2, which is far quicker and doesn't require manual data entry.
Option 2: Adding Square as a payment processor account, and uploading and reconciling transactions
Reconciling Square payouts appearing on your main bank account statement
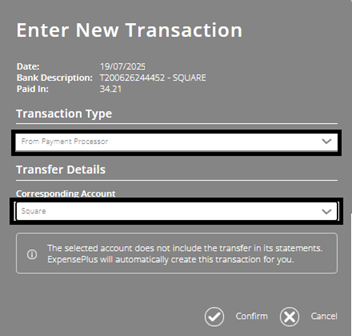
When you reconcile your uploaded bank transactions, select the Square payout on the left-hand table of your match transactions screen, click the + button, then, in the pop-up that appears, select the transaction type as 'Payout from Payment Processor', and then select your Square account.
You will need to set up Square as a payment processor account before you can do this - click here to find out how to do this.
This first step may temporarily make the balance of your Square account in ExpensePlus go negative (until you upload your Square transactions).
Downloading Square transactions (from Square)
(1) Go to the transaction report.
(2) Select the date range, then select 'Export'.

(3) Next to the 'Transactions CSV' option, select 'Generate'. This should prepare a file to download.
If you select the wrong file export option, it will not upload to ExpensePlus.

If you are still using the old version of the Square functionality, please see this separate support article.
(4) Next to the 'Transactions CSV' option, click the download button that appears. The downloaded file will then be ready to upload to ExpensePlus.
Once the download button appears, you can download the file ready to upload to ExpensePlus.
Once the CSV file has downloaded, don't edit or resave the file, or change the file format from .CSV to .XLS/.XLSX, as it may stop the file uploading properly to ExpensePlus.

Importing Square transactions to ExpensePlus
Within the bank reconciliation screen, select your Square account and click 'Upload transactions'.

The upload process works similarly to a regular bank account.

Reconciling Square transactions
The bank matching process for Square transactions works similarly to a regular bank account - with the ability to remember and quick-match transactions.
This means that once you have reconciled Square transactions for the first month, you won't need to manually enter these transactions for future months - instead, you can simply click the 'quick match income' button at the top of the match transactions screen. See How to Quick Match Income.
Where transactions haven't been previously reconciled and auto-remembered:
GASDS Donations
To reconcile contactless card donations that are £30 or under:
(1) click on the transaction in the left-hand table of the match transactions screen;
(2) in the pop-up that appears, select the 'GASDS Donation' option and enter the details.
Contactless card donations over £30 are not eligible for GASDS and should be entered instead as 'Other income' / 'Income Received'.
Other Income / Income Received
To reconcile income for an event or sales income (as well as contactless card donations over £30):
(1) click on the transaction in the left-hand table of the match transactions screen;
(2) in the pop-up that appears, select the 'Other Income' option and enter the details.
Consider shortening the 'Description to Remember' field to just the first part of the description e.g., 'cafe -' as this will enable all future sales / event income to auto-match!
Card/Payment Process Fee
To reconcile Square transaction fees:
(1) click on the transaction in the left-hand table of the match transactions screen;
(2) in the pop-up that appears, select the 'Card/Payment Processor Fee' option and enter the details.
Consider shortening the 'Description to Remember' field to just 'Fee -' as this will enable all future Square transaction fees to auto-match!
Recording Square CASH that is banked (not relevant for most organisations)
This is only applicable where Square is being used as a till system through which cash is being recorded.
If you are using Square as a till system where both cash and card sales are being recorded, then your Square balance will be made up of both cash held and card transactions that have been collected and are awaiting payout to your bank account.
If you wish to bank cash from your till, then to record this within ExpensePlus, you need to go to the Bank Deposit screen, and use the 'Plus Cash Added from Petty Cash / Till System' section to record the cash being banked.

This will automatically create an entry in your Square account in ExpensePlus, causing your Square balance to reduce - reflecting that the money has been banked.
Why is my Square statement not uploading?
- Date (each transaction must contain a date)
- Description (each transaction must contain this)
- Invoice Number (each transaction must contain this)
- Total Collected (each transaction must contain an income amount)
- Fee (each transaction must contain this, even if it is zero)
Note that:
- Additional columns can be present but won't be imported;
- The file format should be .CSV
If you are still using the old version of the Square functionality, please see this separate support article.
To better understand the Bank Reconciliation functionality, please watch the module overview video here.