Exploring user roles
This article details what user roles are, how each role differs, and how they can be customised.
ExpensePlus is designed to streamline the financial process flow, remove duplication and improve efficiency.
It provides each team member, whether staff, volunteer or trustee, with their own personalised user access and permissions.
You can also give users access to approve expenses and view relevant, drillable and up-to-date financial reports; and give your independent examiner or auditor 'view only' access to your data and workflow.
Customising user access
You can customise user access in 3 main ways.
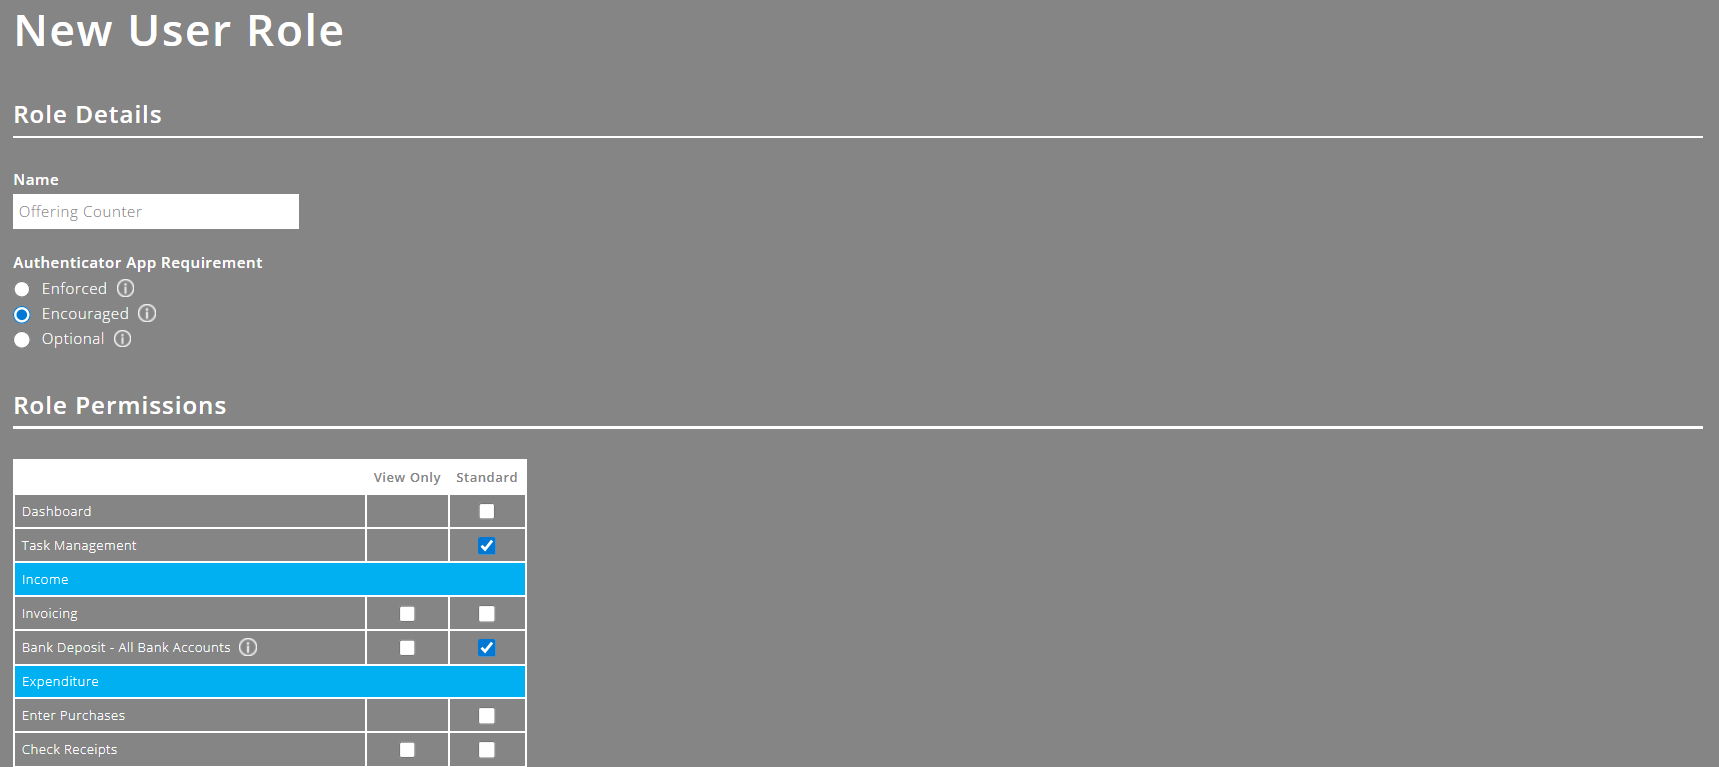
1. Assigning a user to a user role
A user role determines the modules to which a user with that role will have either 'standard' or 'view' access. There are 6 default roles (you'll find further information about these below), but you can add as many additional roles as you wish. You can customise roles in the Manage User roles screen.
2. Setting individual user permissions
This enables you to specify which funds and categories a user can access, and which type of purchases they can submit. This can be different to another user with the same user role. Find out more about user permissions here. User settings can be customised in the User Settings screen.
3. Additional customisation options
There are lots of other ways you can further customise user permissions. For example, rather than giving a user access to all petty cash or all bank accounts, you can set this 'per account'. There's more information about how you can customise ExpensePlus per module in our HelpGuide article How much can I customise user access?
ExpensePlus user roles

By default, ExpensePlus is set up using the following 6 user roles. Note that all the roles listed below (except for the 'Finance Team' and 'Independent Examiner/Auditor') can be customised.
Admin Team
Admin team members can perform basic administrative functions such as issuing invoices, recording bank deposits, entering purchases, and using petty cash. They can usually add other users but can't change any other system settings. They have no default visibility of financial reports (other than set for their specific user) and can't see donations or Gift Aid information. They have no delegated approval responsibility.
Finance Team
A Finance Team user has the 'All-Access pass' for ExpensePlus. The Finance Team user role can do anything and everything in ExpensePlus. This role should not be given to a user simply because they are in what you may describe as your 'finance team' within your organisation. Indeed, we recommend you restrict the number of users who have Finance Team access to between 2 to 3 users. You can't customise the role permissions of this user role.
Budget Holder
This is a user profile with minimal access and functionality. By default, it is identical to the User role (see below). It allows a user to submit purchases and, where their specific user account has been made a primary or secondary approver of a category, they can also approve purchase requests. Our Help Guide, Access to categories, has information on how to set category permissions, including how to give budget holders access to income and expenditure reports.
The reason it exists as a separate named role to the simple role of 'User' is to allow you to easily customise the role for people with budget approval permissions, allowing you to extend their responsibilities as a 'group' if needed.
User (recommended for most users)
This is the most commonly used role for basic users of ExpensePlus. The permissions by default are identical to the Budget Holder, submitting purchase requests only. (See above for guidance as to how to use this concurrently with the Budget Holder role.)
Independent Examiner or Auditor
This role provides your independent examiner or auditor with full visibility of your data and workflow, for their audit purposes. They'll be able to 'see' everything they need, but won't be able to change settings, manage donors or approve expenditure. The role permissions of this role cannot be customised.
Trustee
This role is designed to help trustees view and scrutinise a basic selection of financial reports without being able to change data in the system.
Adding user roles
You can also add and customise your own roles using the 'Add role' button.
Here are some examples of other roles you might create:
- Offering Counter - for entering bank deposits
- Invoicer - for someone generating room hire invoices as their sole involvement
- Super Trustee - for a member of your trustee team who also takes care of Gift Aid.
Within each role, you can specify whether users with that role have 'standard' or 'view only' access to each module / report.
Always check that you are happy with the combination of permissions and visibility that a user's specific 'user settings' and 'role' settings bestow on them.
If in doubt, grant fewer permissions and increase these later.
The more permissions you give a user, the more options they will see. This might also make the system more complicated for them.
To help you understand how to customise ExpensePlus, watch the module overview video here.